Chapter 03 Creating Visual Communication
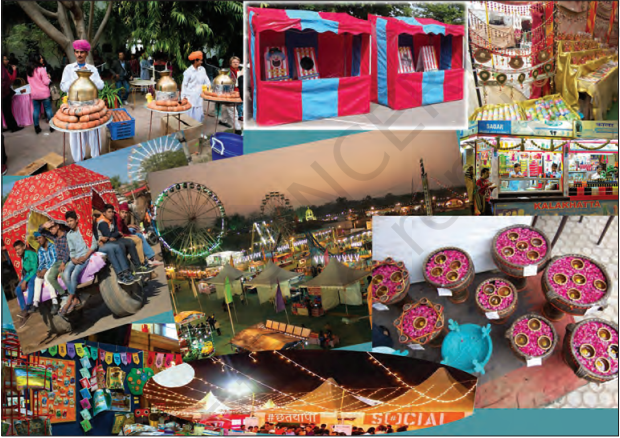
Samayra and Shirom visited a fair organised in a village and wanted to write and send an article in a newspaper consisting of a writeup and a collage. They were very happy as Samayra was fond of photography and Shirom was good at writing articles. Samayra took pictures throughout the day and in the evening they both sat down to check those pictures. When they saw the pictures they were not happy as the pictures were a little dull and not focussed properly.
Shirom: Samayra, don’t get upset I am familiar with a graphics editor software which will help us in modifying and enhancing these images.
Samayra: Shirom, do you know editing can also be done with a smartphone.
Shirom: Yes Samayra, you are absolutely correct, but I know a Free and Open Source Graphics Editing Tool which can help us to enhance images we have.
GIMP is a multimedia tool suitable for a variety of image manipulation tasks, such as photo editing, collage creation and free from drawing. GIMP stores an image in .xcf format.
Check Yourself
What needs to be checked for selecting a picture for an article?
(a) Clarity of picture
(b) Information in the picture
(c) Size of the picture
(d) Any other _________
Shirom: Samayra, now tell me what modifications you want in these images. I will demonstrate how we can use various features of the graphics editor for modifications in these images.
Shirom: Let’s first open the image we want to modify. (Refer Fig. 3.2).
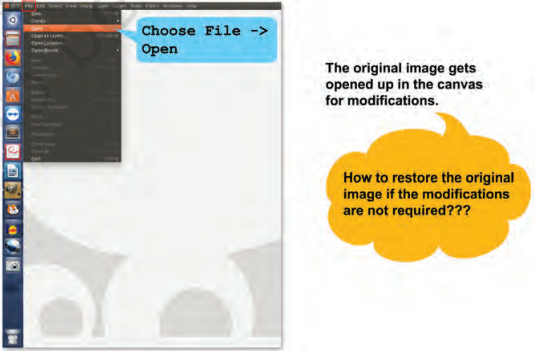
Fig 3.2: Opening an image
Canvas is the area where you insert and modify an image. A canvas can have many layers. A layer comprises one image. The New option of File menu also opens a new canvas where we can mention the size of the image. The size of an image is measured in pixels. A pixel is the smallest illuminated area on a screen.
Samayra: Shirom, see this image. It contains some unwanted areas which I don’t want. Refer Fig. 3.3.
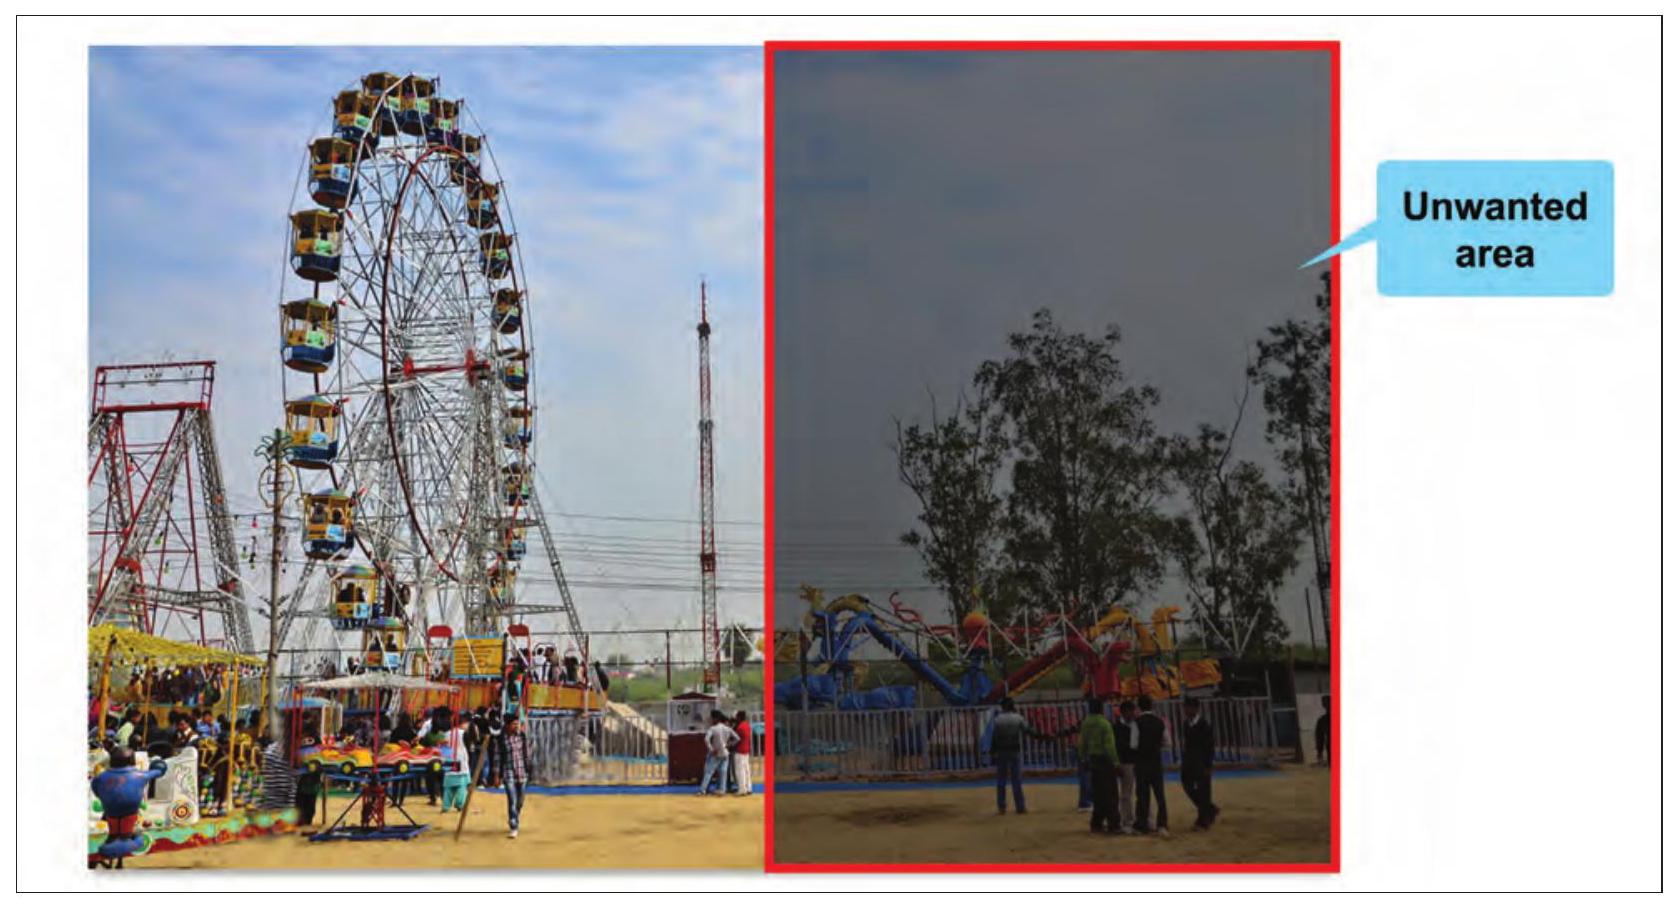
Fig. 3.3: Image showing unwanted area
Shirom: Don’t worry Samayra let me tell you how you can remove the unwanted area of the picture. This is known as cropping as shown in Fig. 3.4.
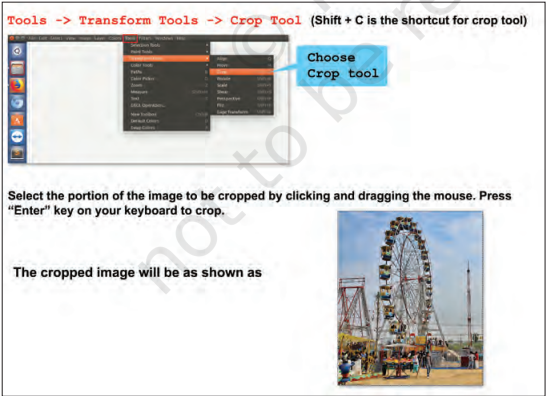
Fig. 3.4: Cropping an image
A Toolbox is an area which contains tools to perform basic tasks. Tools can be added or removed as per our requirements. The toolbox is placed by default on the left side when you open GIMP interface. One can also select the portion to be cropped by using Tools
Selection Tools Rectangle Select. Select and then select Image Crop to Selection to crop an image. Samayra: Yes Shirom, this is exactly what I wanted.
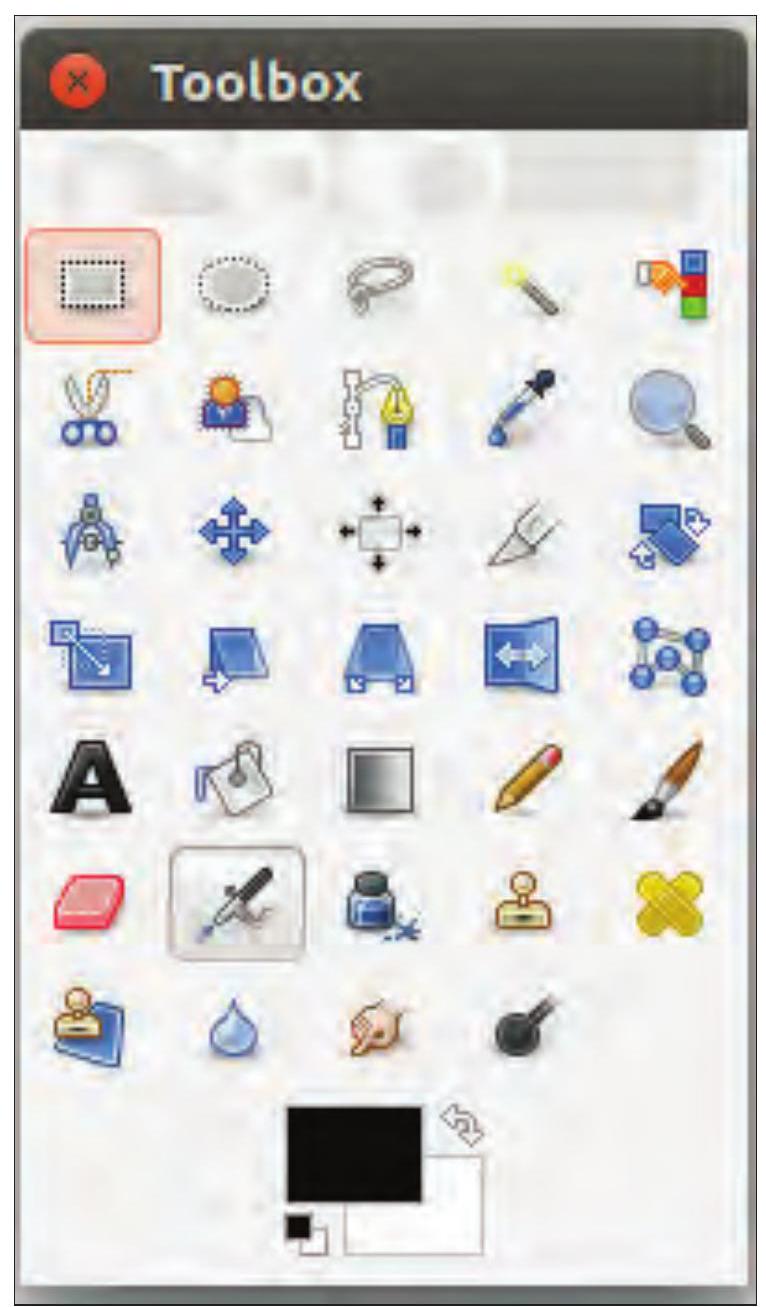
Fig. 3.5 : Tool Box
Moving the mouse pointer over the tool in the toolbox, as shown in Fig. 3.5 and letting it rest for a moment, usually displays a ’tooltip’ that describes its usage. Short cut keys are also frequently shown in the tooltip. In many cases, you can hover the mouse over an item and press the F1 key to get help about the tool that is underneath the mouse.
Shirom: Samayra, let me now tell you how to create a copy of an image. For this we will have to create a new layer. Refer Fig. 3.6 to add, a new layer.
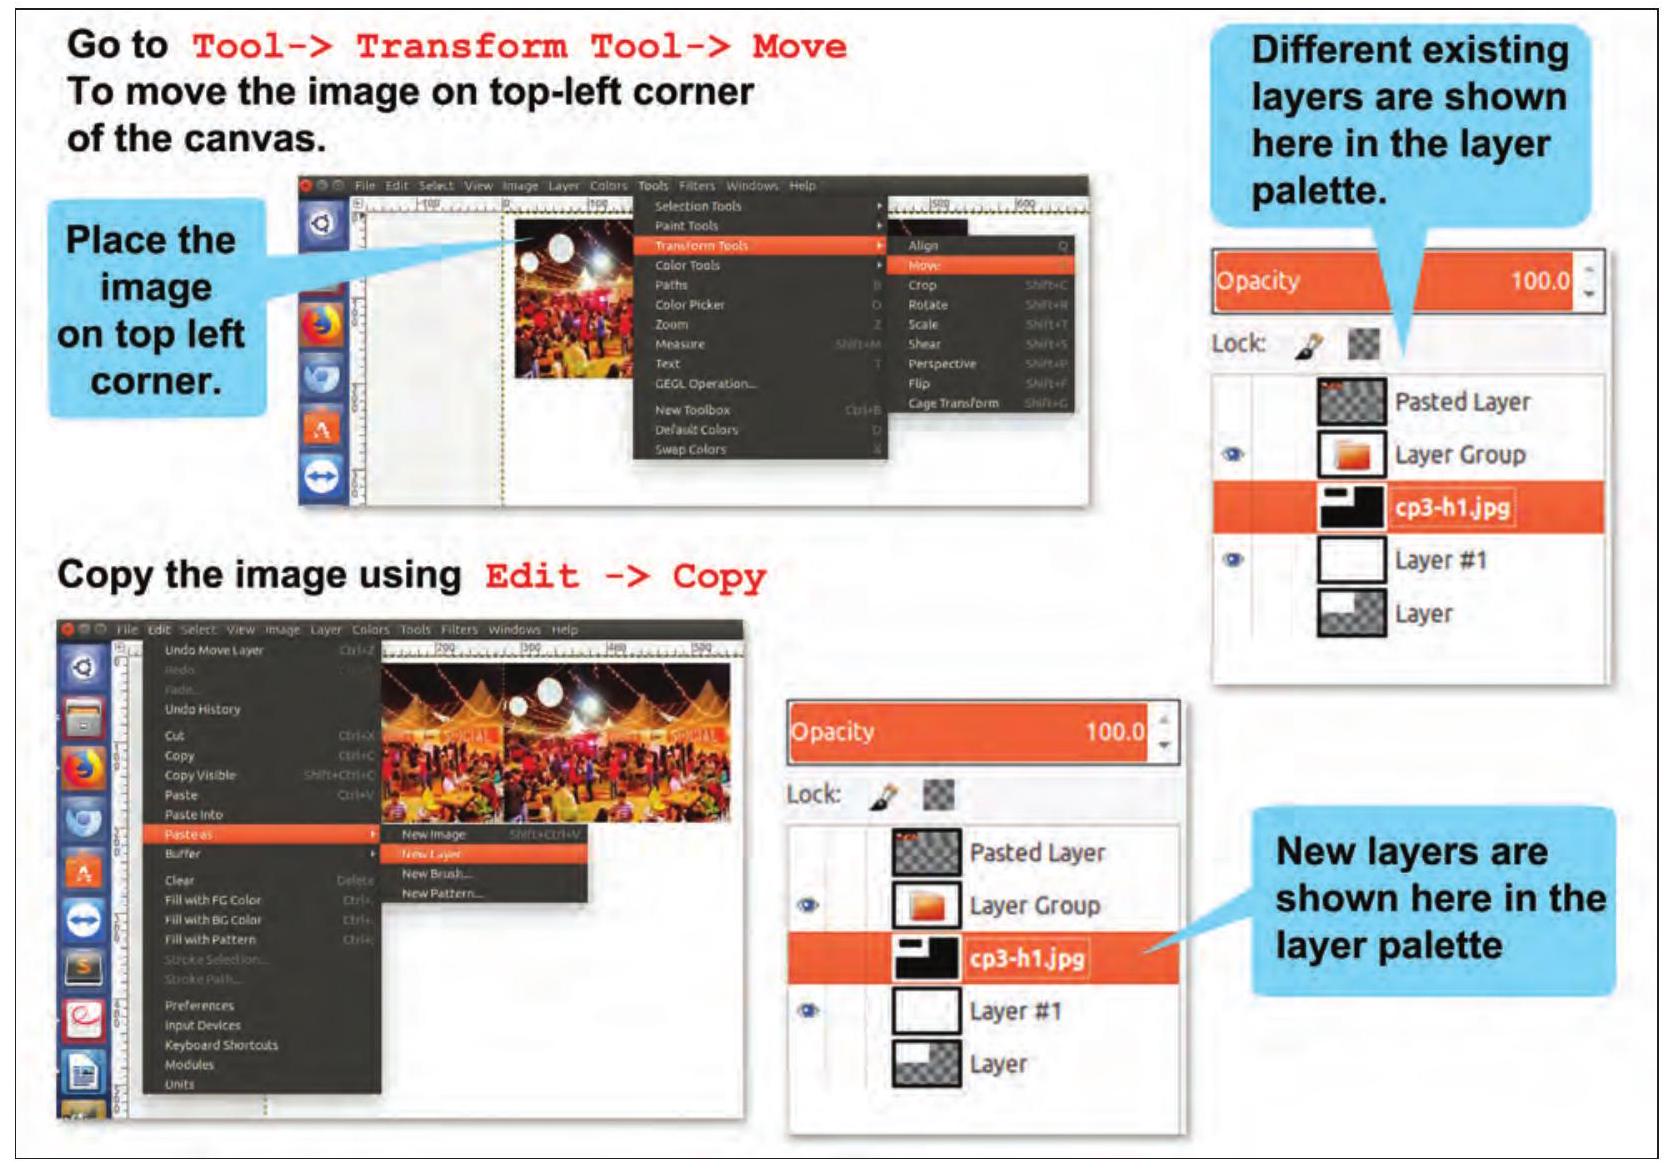
Fig. 3.6 : Layering an Image
Paste the copied image to new layer using Edit
A new layer with the image is created on top of the previous layer. Click on the image and using the Move Tool to move the image to right side of the existing image.

Fig. 3.7 : Copied image
Samayra: Shirom, I was thinking of creating a replica of this image but in the opposite direction.
Before flipping should a copy of the image be kept?
Shirom: Oh, that’s known as flipping an image.
To do that we first need a copy of the image you want to flip. Refer Fig. 3.8 to flip an image.
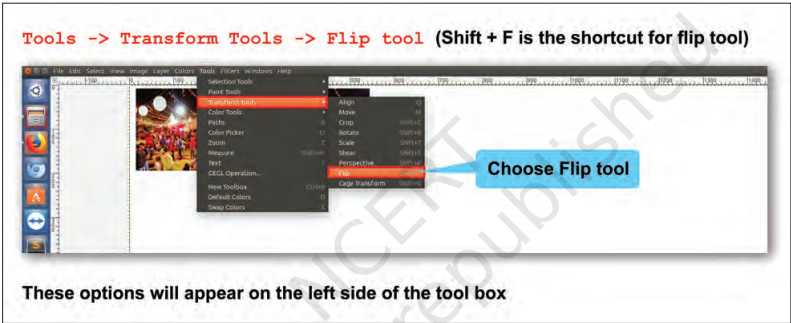
Fig. 3.8: Flipping an image
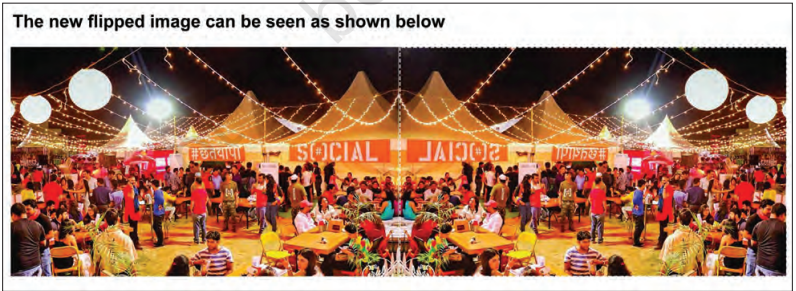
Fig. 3.9: Flipped image
Shirom: Samayra, just like flipping we can also rotate an image. Refer Fig. 3.10 to rotate an image.
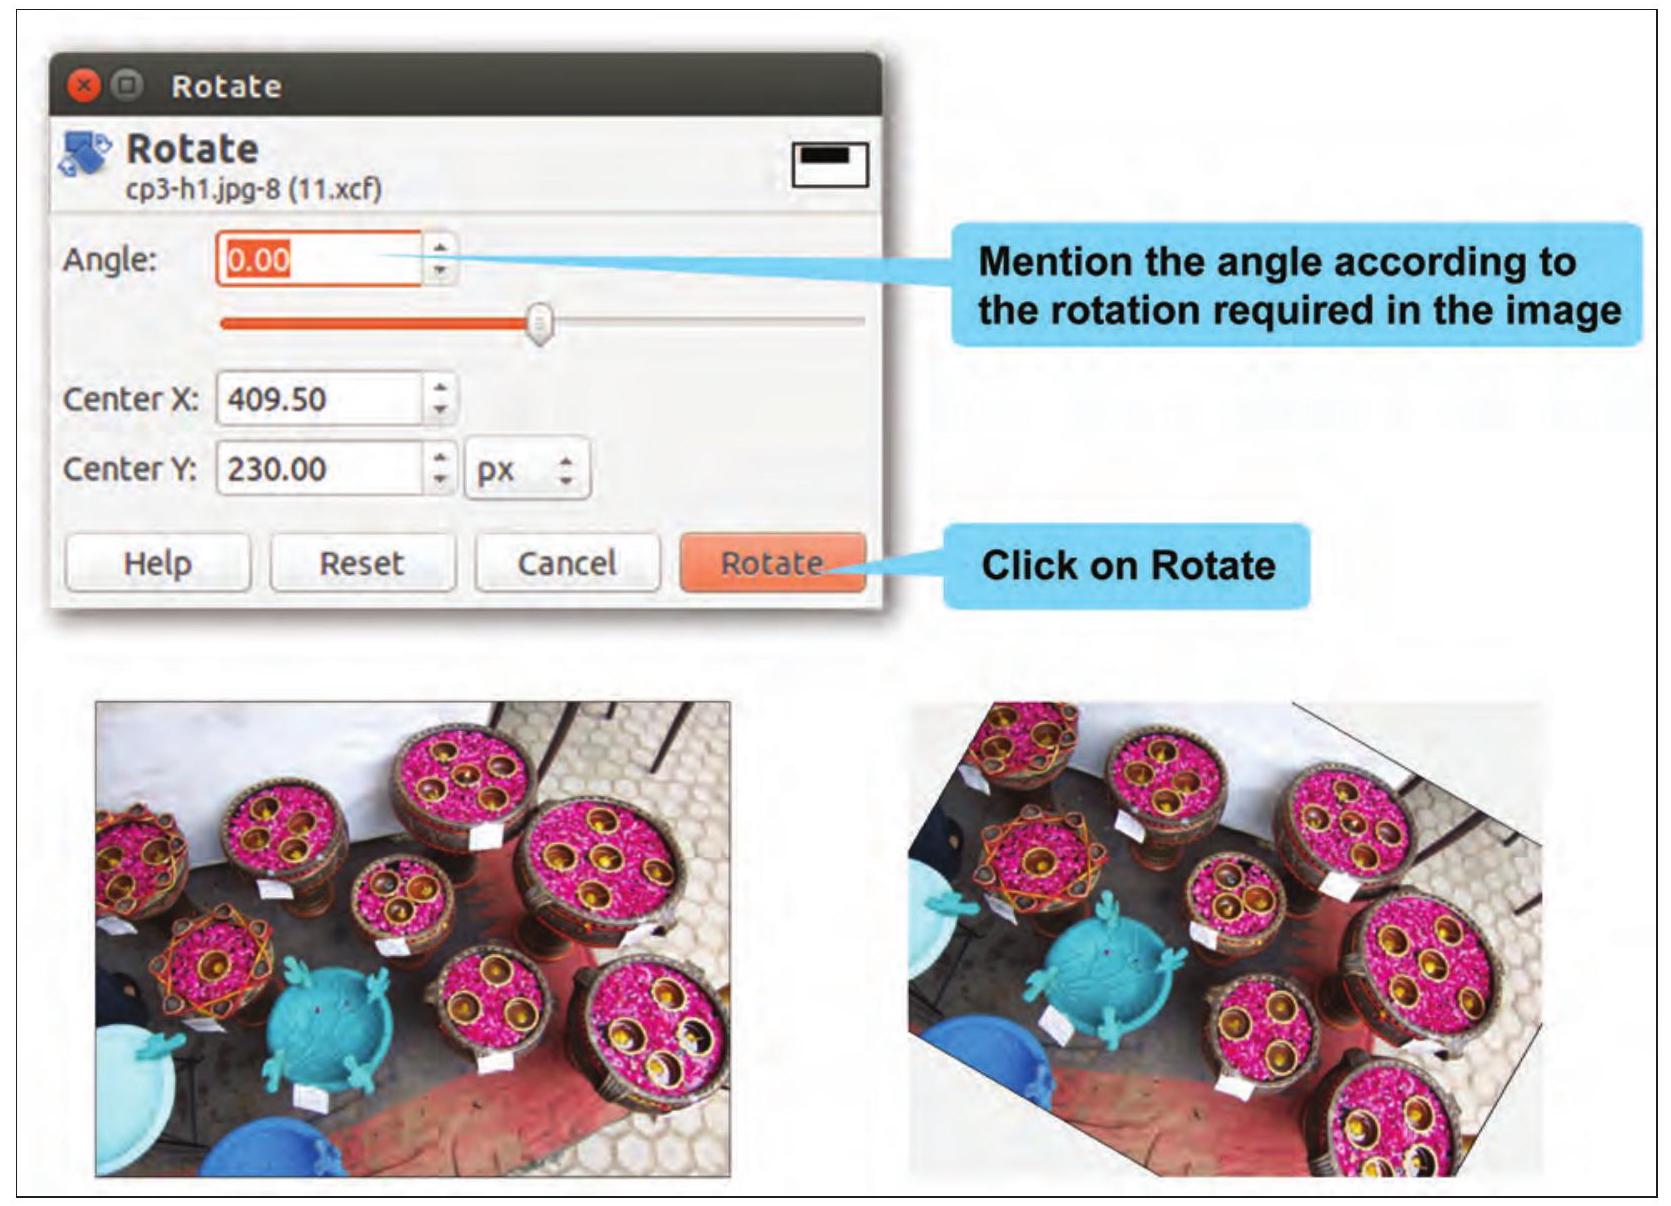
Fig. 3.10: Rotating an image
Check Yourself
Download an image of a flower.
- Create a copy of this image.
- Use the shortcut key to crop certain areas of this image which you think are not required.
- Flip the cropped image vertically.
- Rotate the flipped image by 90 degrees.
Shirom: Another important aspect is to reduce the size of an image so that it can be mailed or used for any other purpose. The solution for this is to scale the image. Scaling down is the process of reducing the size of an image. This will change the number of pixels it contains and resize the canvas accordingly. An image can be scaled in two ways.
a) Using Tools
b) Using Image
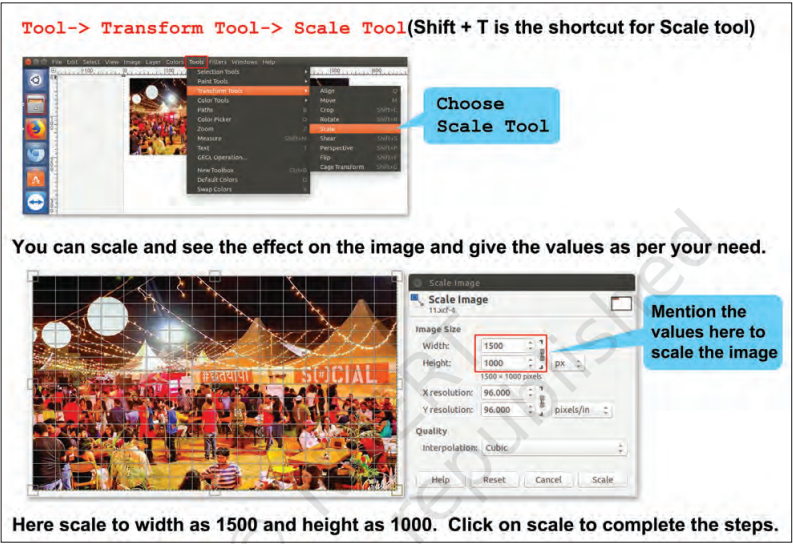
Fig. 3.11(a): Scaling an image using Tools menu
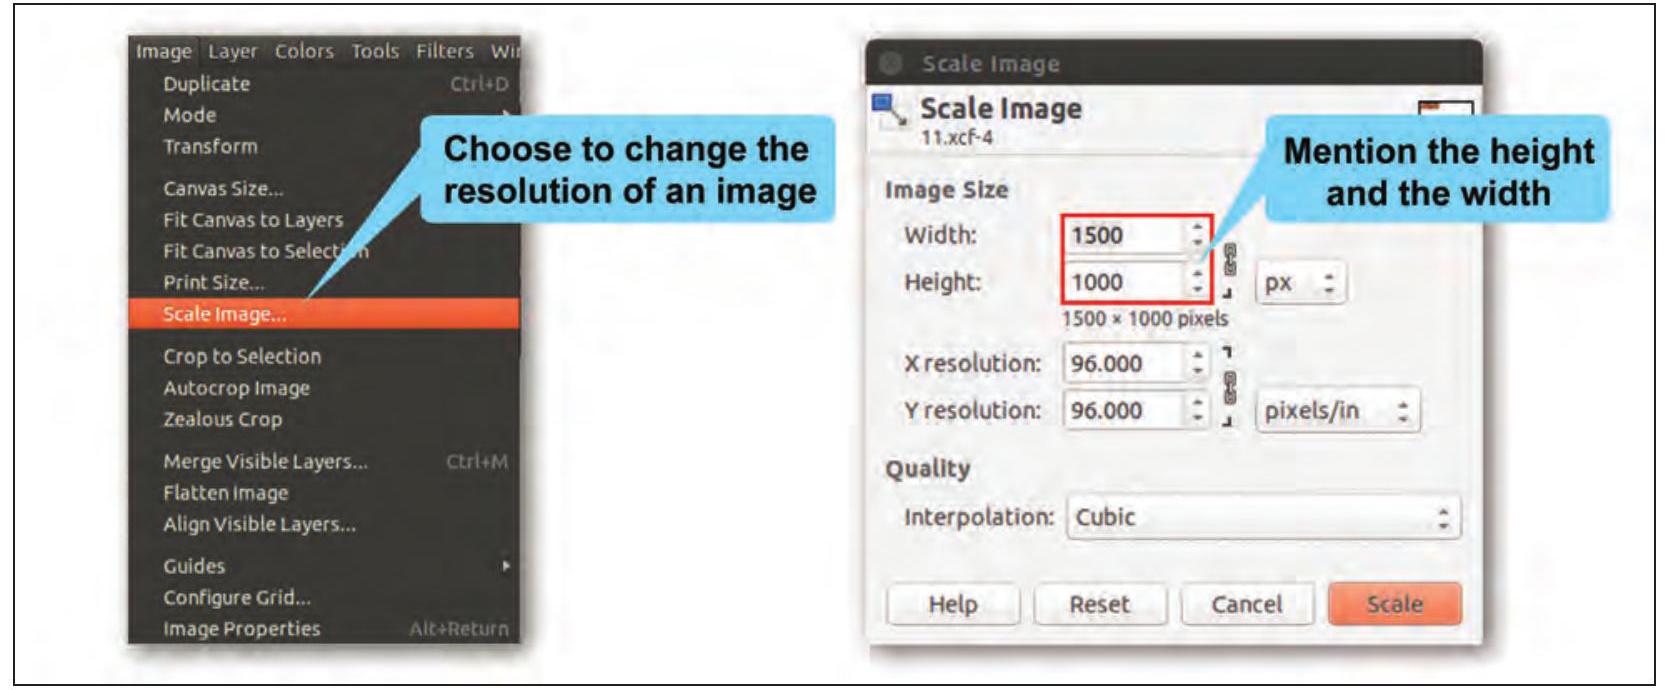
Fig. 3.11(b): Scaling an image using Image menu
Shirom: So, now another important feature of GIMP is the brightness control tool which helps us in enhancing an image. Let me tell you about how to use this feature to make dull images bright. Refer Fig 3.12 to brighten an image.
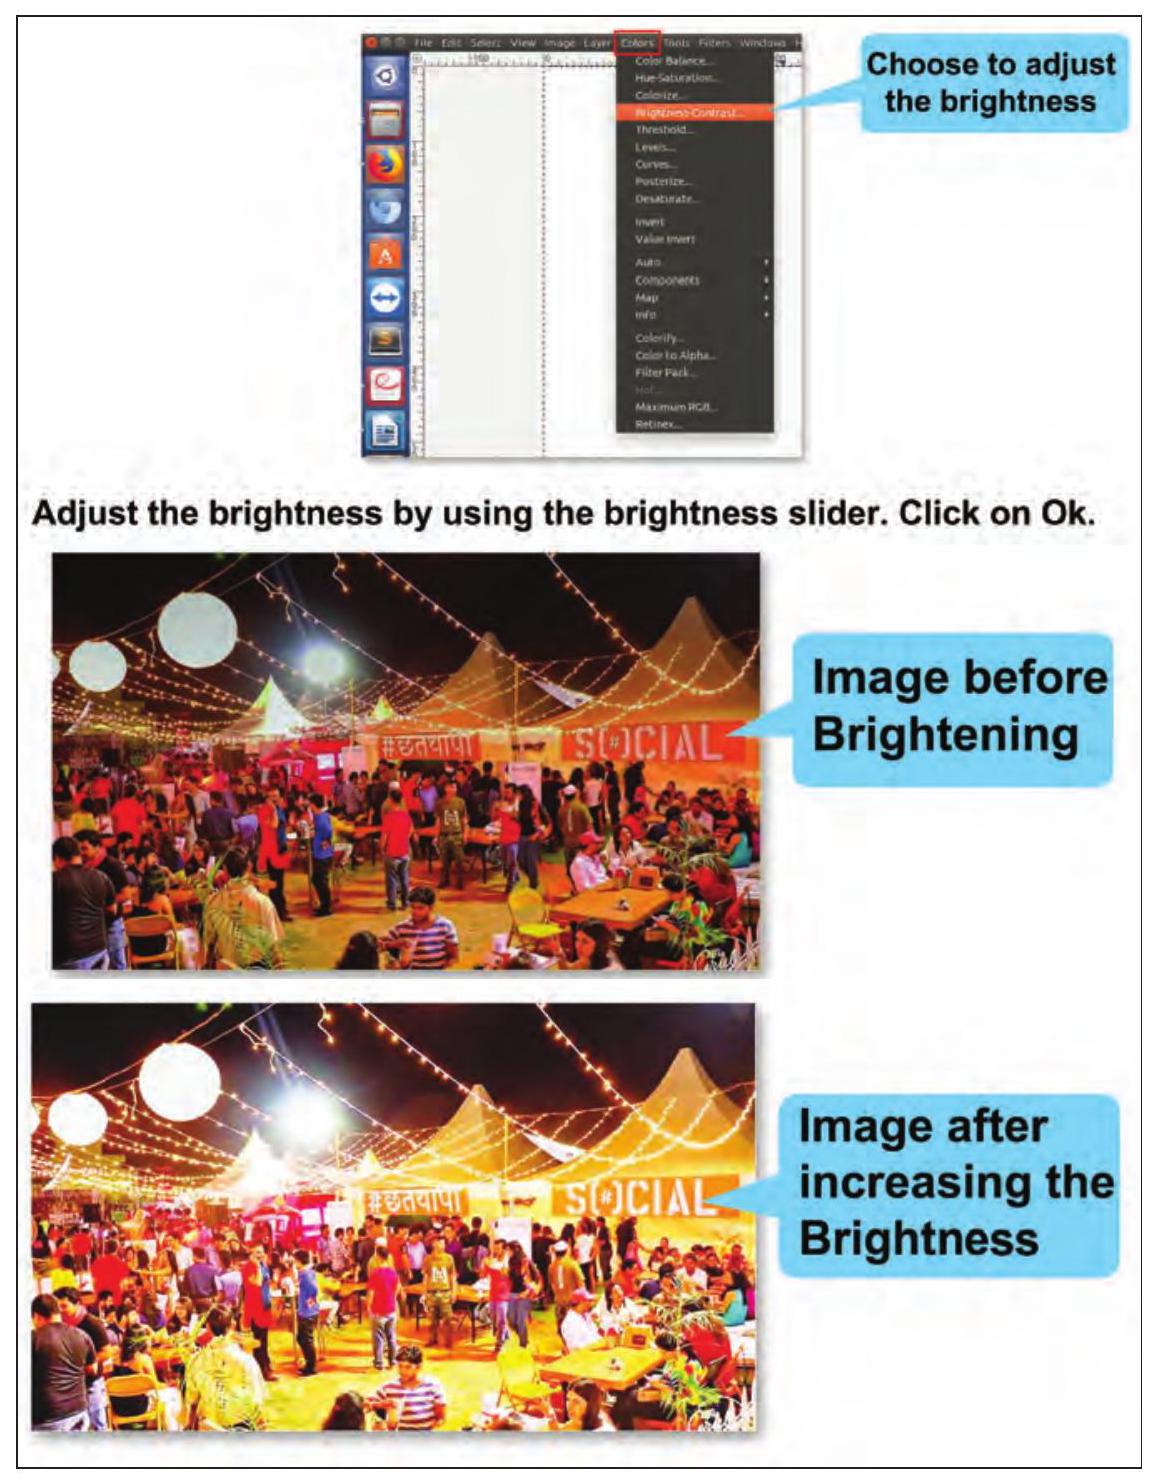
Fig. 3.12: Brightening an image
Shirom: Samayra, let me now tell you another very interesting feature with the help of which I will create the reflection of an image.
Samayra: Oh that’s great! Shirom, this will further help us to enhance our images.
Samayra: Shirom, I want you to reflect the given image (Refer Fig. 3.13).
DPI stands for Dots Per Inch which technically means Printer resolution. Today, it is a term often misused, usually to mean PPI, which stands for Pixels per Inch which is the display resolution. Higher the resolution better the printing quality.
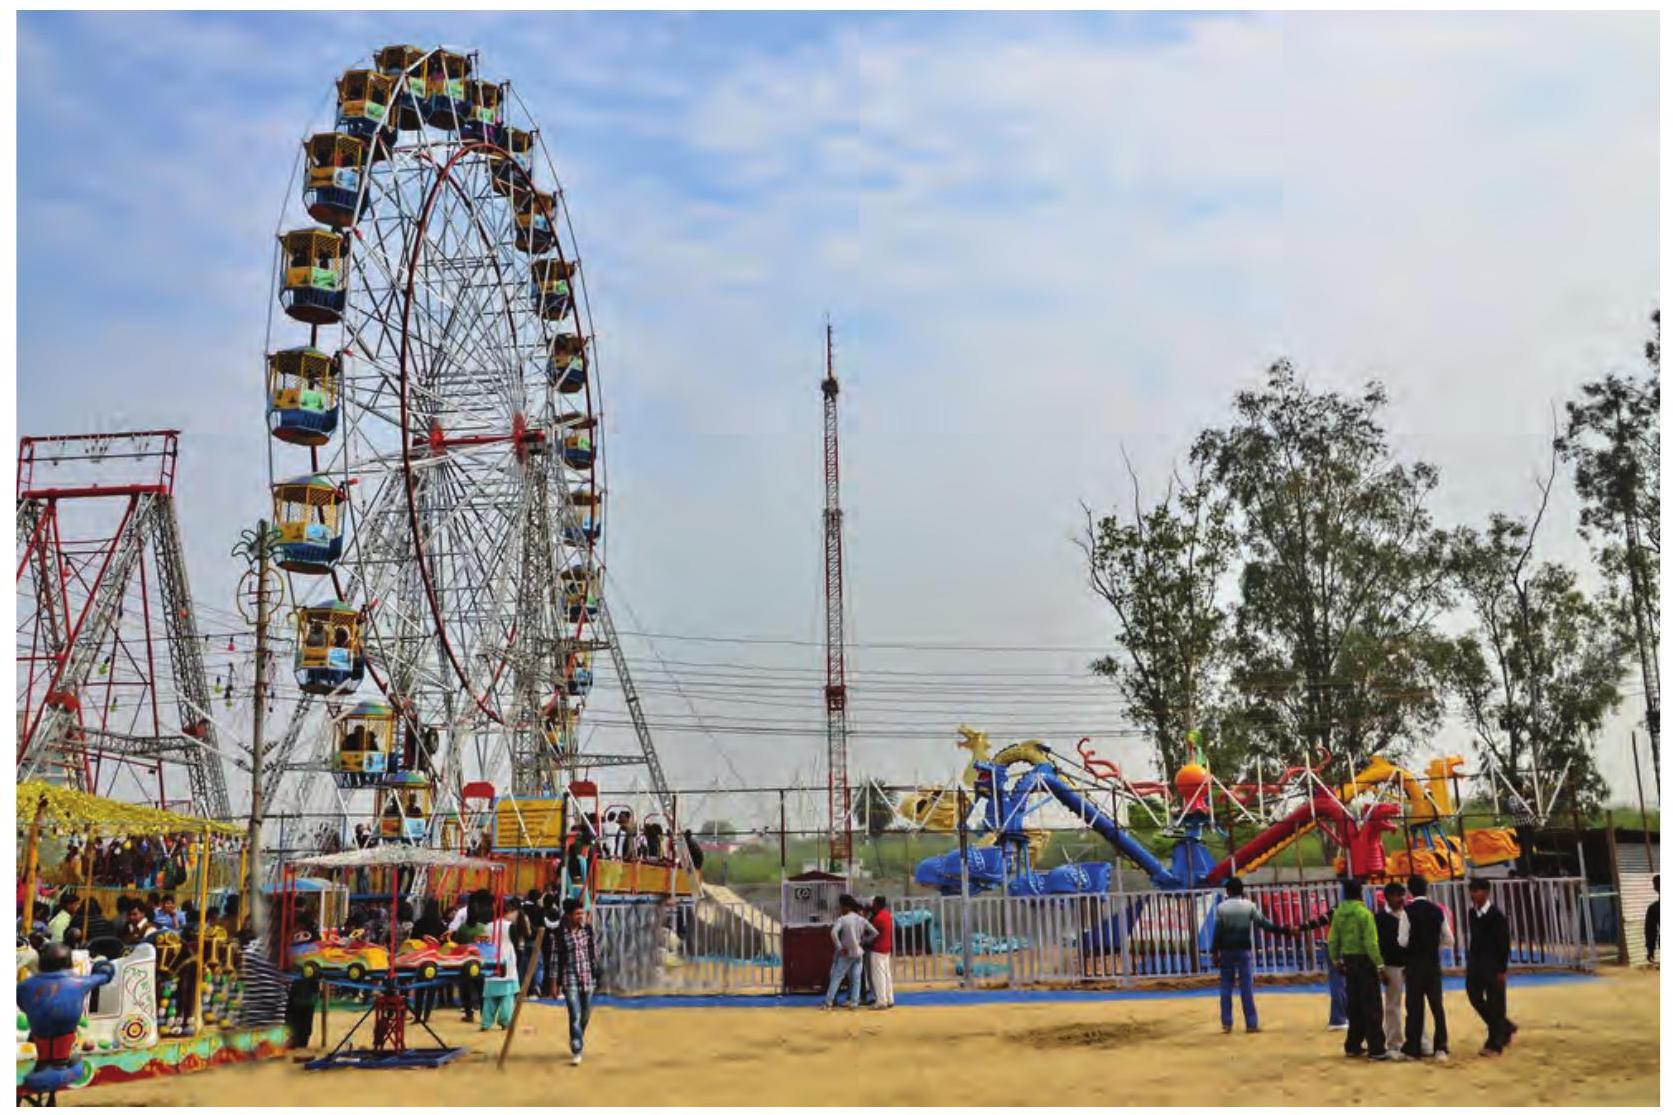
Fig. 3.13: Image to be reflected
Shirom: Samayra, now I will describe the steps to reflect an image.
1. Create a new file
2. Copy the image you want to reflect and drag it on top with the Move Tool and Scale to its half of the image canvas size in Height.
3. Duplicate the layer by right clicking on the layer of the image then choose-Duplicate Layer.
Layer palette displays all the layers in the canvas and can be made visible by choosing Windows -> Dockable Dialogs -> Layers.
6. Right click on the new layer in the Layer palette and click on Add Layer Mask and choose White (for full opacity). Click on Add. (Refer Fig. 3.16).
7. Add a gradient with the Blend Tool and to be more precise, click on Ctrl key while using this.
8. In the Layer Window set the opacity of the new layer to
9. Click on the vertical rule and drag mouse and add a perspective by choosing the Perspective tool.
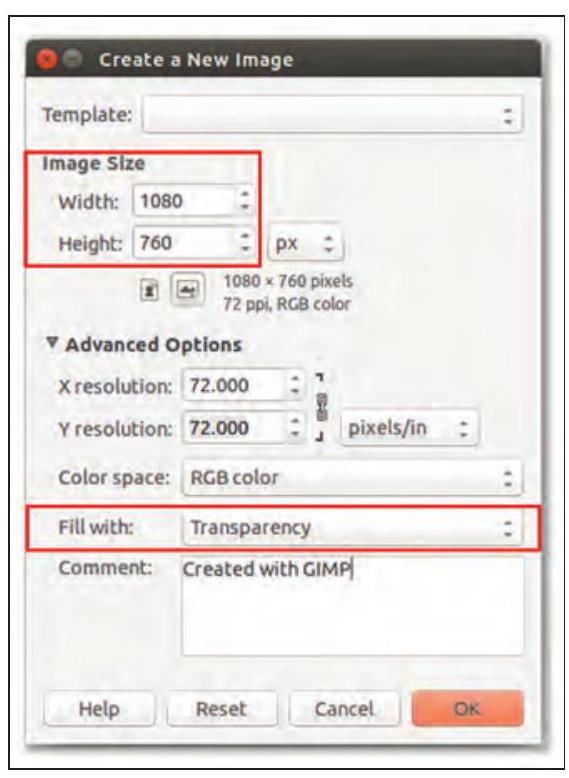
Fig. 3.14 Creating an image with transparency
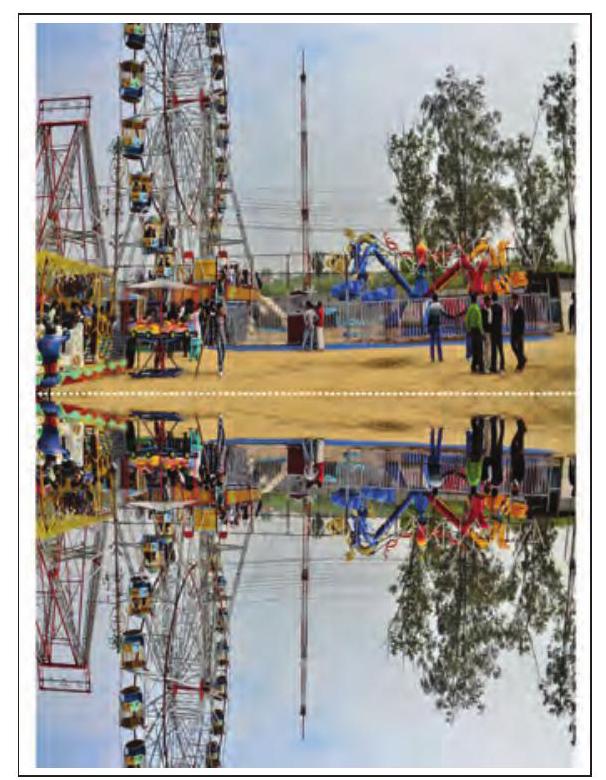
Fig. 3.15: Flipped layer of an image
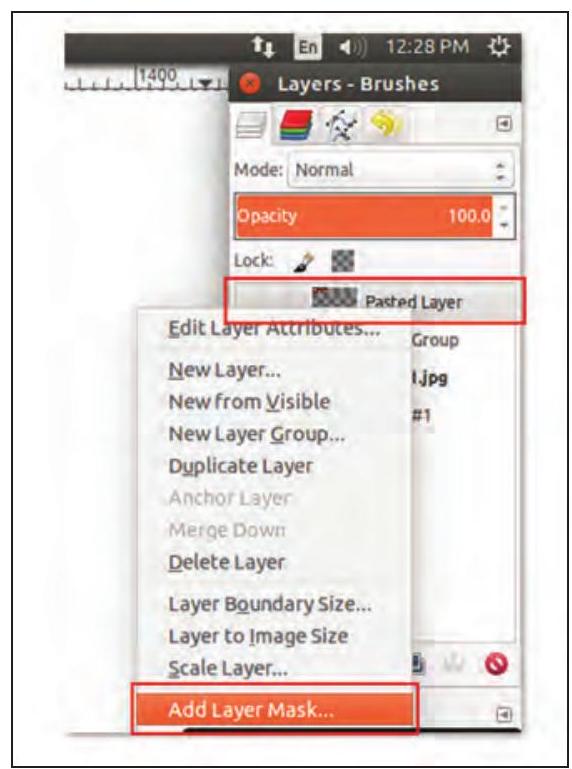
Fig. 3.16: Layer palette
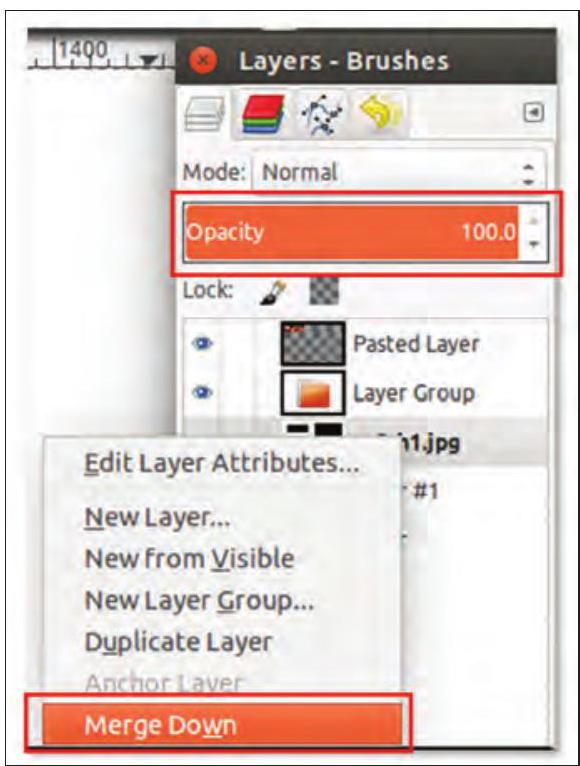
Fig. 3.17: Merging down a layer from layer palette
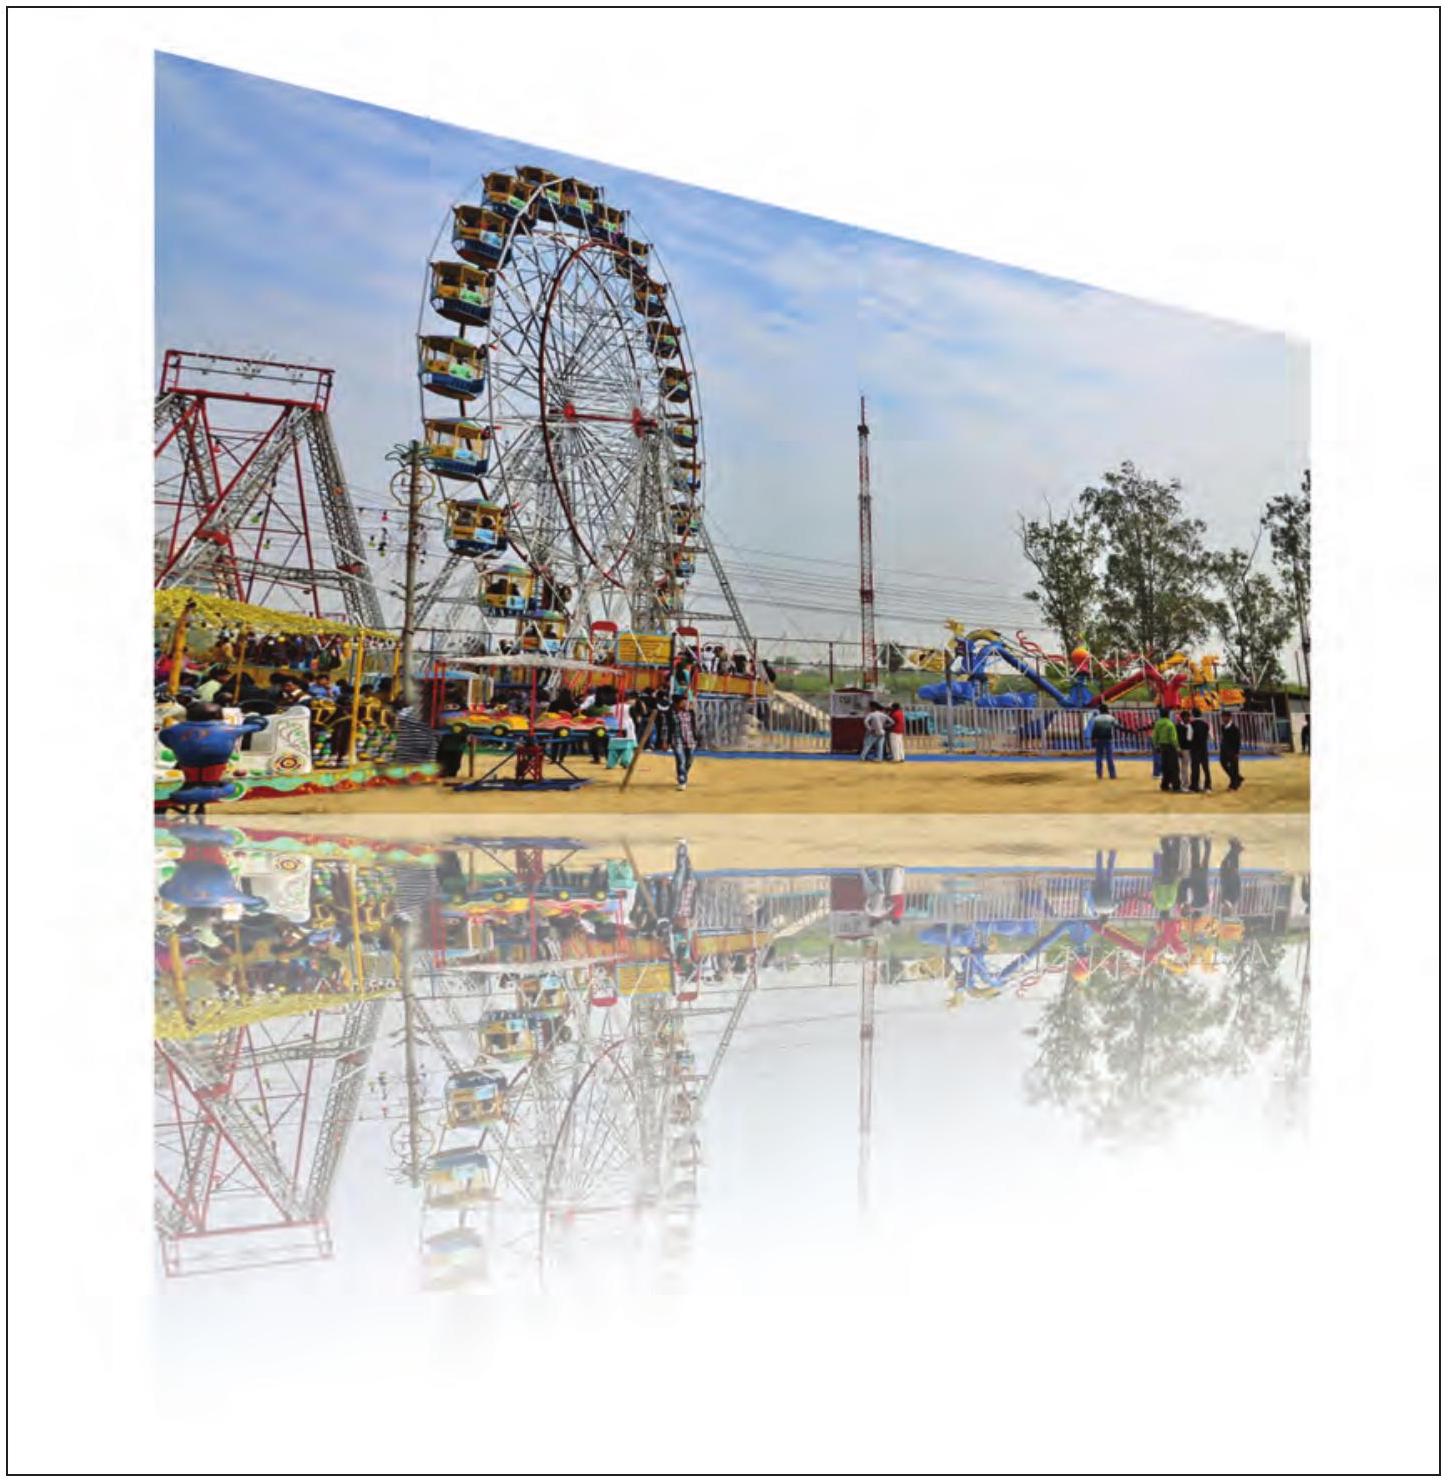
Fig. 3.18: Reflected image
Samayra: The reflected image looks so beautiful (Refer Fig. 3.18).
Shirom: Samayra, now I will tell you how to add text with effects as an image.
For adding text as an image follow the given steps:
1. Create a new image of appropriate size (
2. Set the Background colour of the canvas to black by changing the RGB values to
3. After setting the RGB values choose the Bucket Fill Tool, to fill colour in the canvas.
4. Now choose the Text tool from the toolbox.
5. Next step is to change the foreground to white RGB
6. After setting the text boundary type in the required text. “A VILLAGE MELA”. The text will be added as a new layer (Refer Fig. 3.19). The Layer palette will have two layers now. The newly added text layer and the background layer.
7. Now right click on the new canvas with text and choose New from Visible option. This again adds a third layer with the name “Visible” in the layer palette (Refer Fig. 3.20).
8. Give effects to text as per your requirement by choosing Filter
9. Now, I am going to add a new layer with plasma effect. To add plasma effect choose Filter
10. The next step is to generate a fake 3D shape on this plasma layer. The process is known as ‘bump mapping’. To do this select Filter
11. Now, I will isolate our bump mapped text. For the same add a Layered Mask with White (Full Opacity) to the plasma layer: Layer
12. Now, copy the ‘Visible’ layer and paste it into the layer mask for the plasma layer.
13. Make plasma layer active by Left-Clicking on it and Paste the “Visible” layer on it. Edit
14. The next step is to get this Floating Selection into the mask so we need to Anchor it by choosing Layer
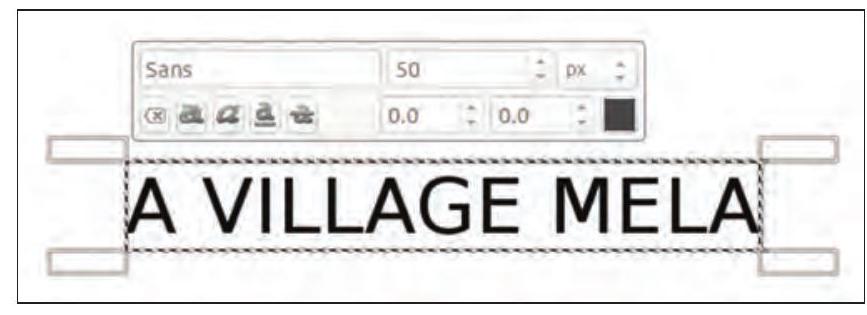
Fig. 3.19: Text as an image
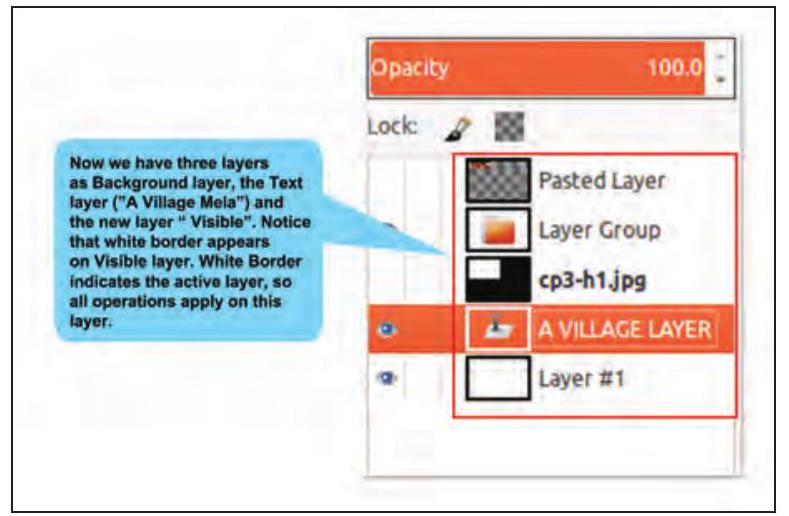
Fig. 3.20: Layer palette with three layers

Fig. 3.21: Layer with plasma effect

Fig. 3.22: Text as an image
Finally, save the file by clicking on the File Menu
Samayra: Shirom, I don’t like the red color of the text on the board of the given image. (Refer Fig. 3.23).
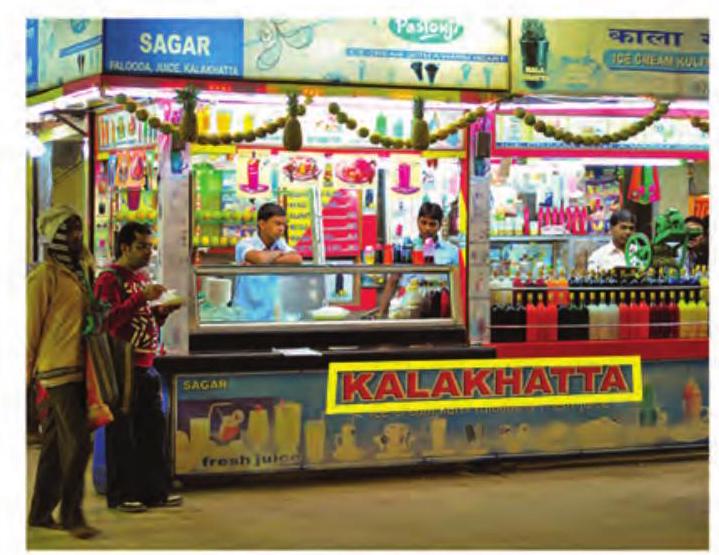
Fig. 3.23: Image with unwanted
How to remove the text and merge it with the background?
Shirom: No problem Samayra. GIMP has a feature with which you can remove patches and merge it with the background. The Clone tool is used to copy from an image or a pattern by using the current brush. It helps in repairing images having problem areas by ‘painting over’ them with pixel data from other areas. This works just like the ‘Format Painter tool’ of a text editor.
Follow the given steps to use the clone tool.
1. Insert the image which requires correction.
2. Select the Tools
3. Hold down the Ctrl key on the keyboard while dragging the mouse. If required change the size the clone brush by moving the scale button. If Alignment is set to None, Aligned, or Fixed in tool options, then the point you click on becomes the origin for cloning. The image data at that point will be used when you first begin painting with the Clone tool. In source-selection mode, the cursor changes to a reticle cross symbol.
4. You can click on as many areas as you want to clone. The Ctrl key is used to select the source, if you are cloning from an image.
Refer Fig. 3.24 for the final image without text.
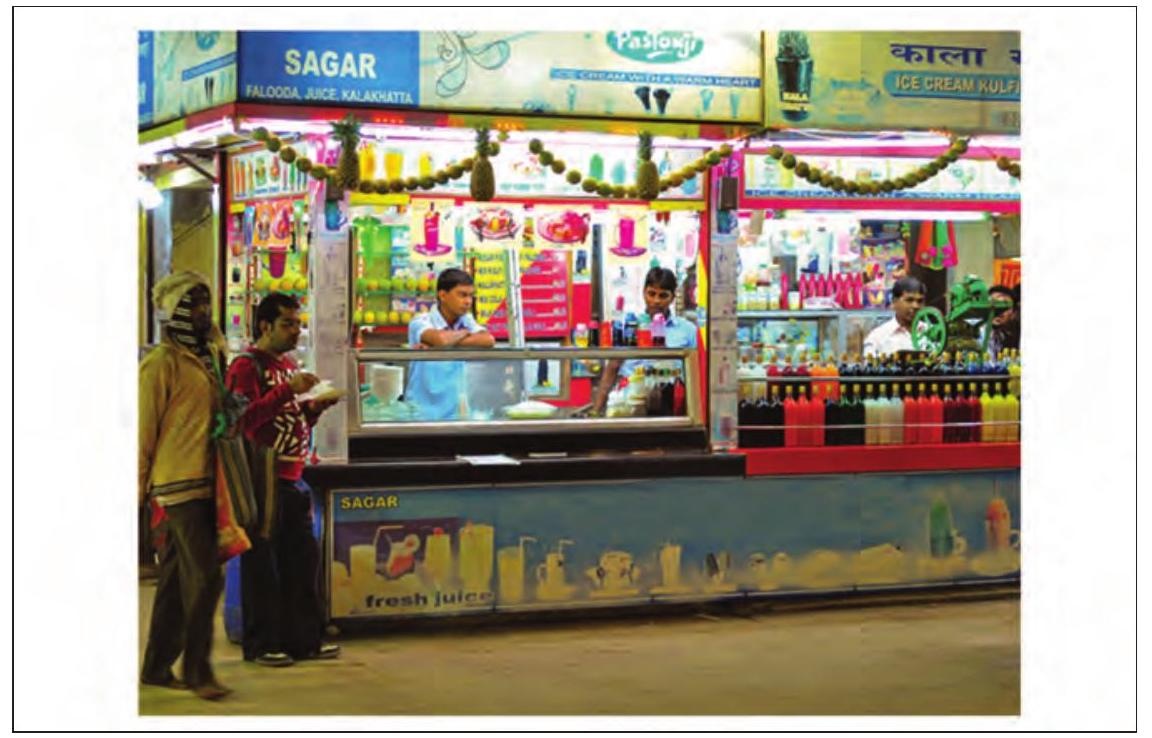
Fig. 3.24 Image without unwanted text
The default file format of GIMP is .xcf. These files are heavy and have low resolution. There are various other file formats into which these .xcf files can be exported. JPEG: Accepted worldwide good quality compressed format. PNG: Good quality bulky format which is supported by all browsers.
TIFF: Bulky but good quality format supported by all image processing software. It is a good practice to modify your .xcf files and export it to a format like JPEG.
By clicking on File
Export, the ‘Export image JPEG’ window will open. Here the quality of the image can be changed.
Samayra: Now, how do we club all these images together in one canvas?
Shirom: That’s not a difficult task Samayra. Let me show you how to do that. Refer Fig. 3.25 to club all images together to create a collage.
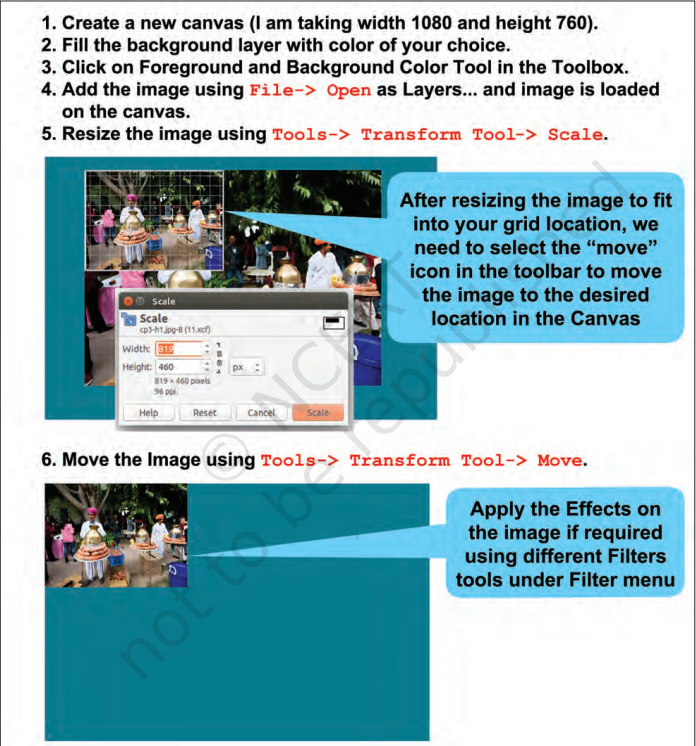
Fig. 3.25(a): Creating a collage
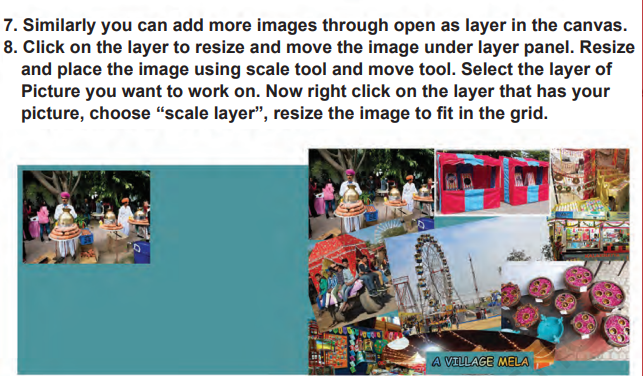
Fig. 3.25(b): Creating a collage
Exercises
1. Fill in the blanks
a. GIMP is an acronym for ______ Image ______ Program. b. An image has some unwanted portion which should be removed by ______ tools.
c. Crop tool is found under ______ Menu.
2. Identify whether the following statements are True or False
a. Flip/Rotate tool is part of selection tool. (T/F).
b. Flip tool can flip at any angle. (T/F).
c. GIMP has a brightness control tool which helps in enhancing an image. (T/F)
d. Scaling down is the process of reducing the size of an image. (T/F)
Do it yourself
1. You have taken a photograph in low light and it appears dull. Using different tools in GIMP, convert this dull photograph into a brighter one.
2. You have a photograph with your friends along with some unknown person in one corner of the photograph. Make an image that has only your friends and submit it to your teacher.
3. You celebrated a festival at home. Make a collage to show different scenes from the celebration.
4. You have an old photograph without any caption. Write a proper caption on the photograph.
Test yourself
1. While using the crop tool which area of the image is cropped? Darkened area or remaining area.
2. Brightness control tool is used for what purpose in GIMP?
3. For what purpose is an image scaled in GIMP?

